Alpine
- 小巧:基于musl libc 和 busybox,和 busybox一样小巧,最小的Docker镜像只有5MB。
- 安全:面向安全的轻量发行版。
- 简单:提供APK包管理工具,软件的搜索、安装、删除、升级都非常方便。
- 适合容器使用:由于小巧、功能完备,非常适合作为容器的基础镜像。
镜像下载
官方下载地址:https://alpinelinux.org/downloads/ | 清华大学开源镜像
- STANDARD:最小的可启动镜像,需要网络才能安装。
- EXTENDED:包括最常用的软件包。适用于路由器和服务器。从RAM运行。扩展版本,带有更多软件包。
- NETBOOT:netboot的内核、initramfs和modloop。
- MINI ROOT FILESYSTEM:最小系统版本,仅包含内核,只用于构建Docker镜像。
- VIRTUAL:与STANDARD类似,但更小,更适合虚拟系统使用。
- XEN:内置XEN Hypervisor支持。
- RASPBERRY PI:带有树莓派内核的版本。
- GENERIC ARM:带有ARM内核,带有uboot加载器。
Alpine 安装
这里由于是使用VMware Workstation在本地安装测试,然后再推送到ESXi,所以基础的设置就略过了。
- Alpine版本为:alpine-virt-3.13.2-x86_64
- 2H2g的配置
- 磁盘为8G
- 网络模式为桥接模式
以ISO文件挂载的方式启动,使用默认的用户 root 进入,接着使用 setup-alpine 进行系统初始化。

其他的设置可以看说明进行,这里就不再一一说明。在一切完成之后,使用 reboot 重启进入系统~
open-vm-tools
使用vmware来管理虚拟机的话是需要一个tools包的,这里我们直接使用命令来安装。
首先检查Alpine的源信息,确保包含了 community
# 检查源
router:~# cat /etc/apk/repositories
#/media/cdrom/apks
http://mirrors.ustc.edu.cn/alpine/v3.13/main
http://mirrors.ustc.edu.cn/alpine/v3.13/community
http://mirrors.ustc.edu.cn/alpine/edge/main
http://mirrors.ustc.edu.cn/alpine/edge/community
http://mirrors.ustc.edu.cn/alpine/edge/testing

# 安装open-vm-tools
apk update
apk add open-vm-tools
rc-service open-vm-tools start
# 开机启动
rc-update add open-vm-tools boot
设置IP
Alpine提供了网络设置工具,可以使用 setup-interfaces 命令进行设置向导。
Clash 部署
程序发布地址:https://github.com/Dreamacro/clash/releases
下载程序
wget https://github.com/Dreamacro/clash/releases/download/v1.4.2/clash-linux-amd64-v1.4.2.gz

# 解压并赋予执行权限
gzip -d clash-linux-amd64-v1.4.2.gz
mv clash-linux-amd64 /usr/bin/clash
chmod +x /usr/bin/clash

# 为 clash 添加绑定低位端口的权限,这样运行 clash 的时候无需 root 权限
apk add --update libcap
sudo setcap cap_net_bind_service=+ep /usr/bin/clash
创建 Clash 配置文件
运行clash之前需要创建配置文件,否则clash无法启动。
mkdir -p ~/.config/clash
cd ~/.config/clash

# 创建配置文件
touch config.yaml
vi config.yaml

# 如果你有clash的订阅地址,那么你可以使用
wget -O config.yaml https://xxx.xxx/xxx/xxxxxxx?clash=1

# 测试配置文件是否正确
clash -d ~/.config/clash -t具体的配置文件格式可以参考:https://github.com/Dreamacro/clash/wiki/configuration
最终的配置大致如下:
# HTTP 代理端口
port: 7890

# SOCKS5 代理端口
socks-port: 7891

# Linux 和 macOS 的 redir 代理端口
redir-port: 7892

# 允许局域网的连接
allow-lan: true

# 规则模式:Rule(规则) / Global(全局代理)/ Direct(全局直连)
mode: Global

# 设置日志输出级别 (默认级别:silent,即不输出任何内容,以避免因日志内容过大而导致程序内存溢出)。
# 5 个级别:silent / info / warning / error / debug。级别越高日志输出量越大,越倾向于调试,若需要请自行开启。
log-level: silent
# Clash 的 RESTful API
external-controller: 0.0.0.0:9090
experimental:
  ignore-resolve-fail: true
# RESTful API 的口令
secret: ''

# 您可以将静态网页资源(如 clash-dashboard)放置在一个目录中,clash 将会服务于 `RESTful API/ui`
# 参数应填写配置目录的相对路径或绝对路径。
external-ui: '/root/.config/clash/dashboard'

dns:
  enable: true # set true to enable dns (default is false)
  ipv6: false # default is false
  listen: 0.0.0.0:53
  enhanced-mode: redir-host # or fake-ip
  fake-ip-range: 198.18.0.1/16 # if you don't know what it is, don't change it
  nameserver:
     - https://doh.pub/dns-query
     - https://dns.alidns.com/dns-query
     - https://i.233py.com/dns-query
  fallback:
     - https://cloudflare-dns.com/dns-query
     - https://doh.opendns.com/dns-query
     - https://dns.google/dns-query
     - https://dns.nextdns.io/dns-query
     - https://doh.233py.com/dns-query

proxy:
...
管理面板
管理面板我所知晓有2个,一个是 Clash Dashboard,另一个是第三方的 Yet Another Clash Dashboard ,这里我采用的是官方的,毕竟是亲儿子支持也好。
官方编译的版本。详见 gh-pages 将其直接下载即可。
访问地址为:http://ip:9090/ui/
自动启动
这里使用了start-stop-daemon来做进程守护
Clash启动脚本
在系统/etc/init.d目录下新建一个clash-server文件,将如下信息拷贝进去。
#!/sbin/openrc-run

name="clash"
command="clash -d /root/.config/clash"
pidfile="/run/$RC_SVCNAME.pid"

depend() {
   need net
}

start() {
   ebegin "Starting Clash"
   start-stop-daemon --start --background \
        --exec $command \
        --make-pidfile --pidfile $pidfile
   eend $?
}

stop() {
   ebegin "Stopping Clash"
   start-stop-daemon --stop \
        --exec $command \
        --pidfile $pidfile
   eend $?
}
可也可以直接下载我配置好的 clash-server
wget -O /etc/init.d/clash-server https://jalena.bcsytv.com/uploads/2021/03/clash-server

# 授予执行权限
chmod +x /etc/init.d/clash-server

# 添加开机启动
rc-update add clash-server default

# 启动服务
rc-service clash-server start

# 查看运行状态
rc-status
最终目录结构
节点管理
使用该方式部署可以直接使用web管理节点,例如我的虚拟机地址为:http://10.0.0.200:9090
使用
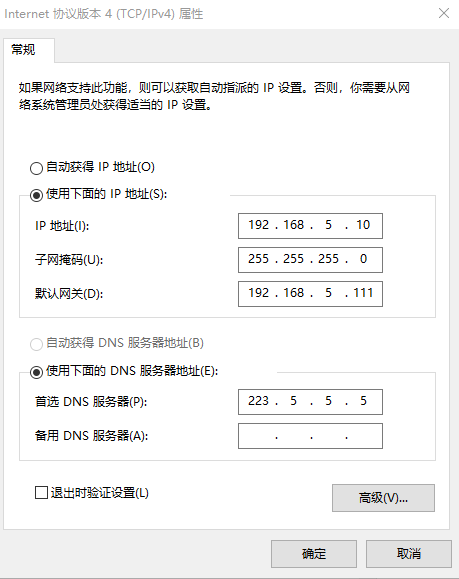
将客户端机器的网关指向到我们的透明代理服务器即可。

测试地址:http://www.ip111.cn/
Docker
当然我们也可以使用Docker容器来跑这样一个服务
创建 docker-compose 文件
services:
  clash:
    image: dreamacro/clash
    container_name: clash
    volumes:
      - ./config.yaml:/root/.config/clash/config.yaml
      - ./Country.mmdb:/root/.config/clash/Country.mmdb
      - ./ui:/ui # dashboard volume
    ports:
      - "7890:7890"
      - "7891:7891"
      - "9090:9090" # external controller (Restful API)
    # # TUN
    # cap_add:
    #   - NET_ADMIN
    # devices:
    #   - /dev/net/tun
    restart: unless-stopped
    network_mode: "bridge" # or "host" on Linux
Dashboard
在实际过程中发现使用别人发布的管理UI会触发跨域规则,所以还是自己挂载一个好点
git clone -b gh-pages https://github.com/Dreamacro/clash-dashboard ui访问地址:http://ip:9090/ui
订阅
从以上配置可以看到,我们是需要将一个订阅文件给持久化到容器的,这里就是下载你的订阅配置
wget -O config.yaml http://your-proxy-url有些供应商会把 external-controller 设为 127.0.0.1,导致很多人搭起来连不上。这里替换成 0.0.0.0
sed -i 's/127.0.0.1:9090/0.0.0.0:9090/g' config.yamlCountry.mmdb
虽然这个文件在没有的时候会自动下载,但是一般速度较慢,还是手动下载比较好,你可以在这里找到对应的文件 Dreamacro/maxmid-geoip/releases 。
wget https://github.com/Dreamacro/maxmind-geoip/releases/download/20220412/Country.mmdb配置的调整
首先检查config.yaml配置文件,以下配置信息需要调整,否则可能造成无法连接的情况.
# 允许局域网的连接
allow-lan: true

bind-address: '*'

# 这个不监听在0.0.0.0回造成无法连接
external-controller: '0.0.0.0:9090'

# 您可以将静态网页资源(如 clash-dashboard)放置在一个目录中,clash 将会服务于 `RESTful API/ui`
# 参数应填写配置目录的相对路径或绝对路径。
external-ui: /ui
服务管理
# 启动服务
docker-compose up -d

# 关闭服务
docker-compose down


文章评论
用不用tun模式iptables配置都是一样的吗
@lewis 是的,这2个不都是一个东西嘛