从 Windows 7 SP1 和 Windows Server 2008 R2 SP1 开始,每个 Windows 中默认随附安装有 Windows PowerShell。
长久一来,在Windows平台上都是以CMD作为主要的命令行工具在使用,但随着Windows 10的普及,开发工具的演进,CMD已经越来越跟不上时代的步伐了。
最近将Windows 10种的PowerShell升级到了最新的LTS版本,总体来说还是不错的,但命令的补全,语法支持都不尽人意,所以在这基础上增加了一些扩充。
Windows Terminal
PowerShell
有多种方法可以在 Windows 中安装 PowerShell。 每种安装方法旨在支持不同的方案和工作流。 选择最符合需求的方法。
- MSI 包 - 适用于日常用户的最佳选择。
- ZIP 包 - 安装多个版本或在 CI/CD 管道中使用的最简单的方法。 这是适用于 Windows Nano Server、Windows IoT 和基于 Arm 的系统的安装方法。
- .Net 全局工具 - 非常适用于安装和使用其他全局工具的 .NET 开发人员。
- Winget -适用于首选使用新 Windows 包管理器工具的用户。
- Microsoft Store 包 - 适用于 PowerShell 临时用户进行安装的一种简单方法,但有一些限制。
最新版本的PowerShell发布在:https://github.com/PowerShell/PowerShell/releases ,直接从这里下载官方发布的releases版本安装即可。
版本的选择最好不要带 preview ,毕竟这只是预览版~
PowerShellGet 包管理器
PowerShellGet 模块包含用于安装和更新模块的 cmdlet:
- Install-Module 安装最新版(非预发行版)模块。
- Update-Module 在模块的最新版本高于当前安装的模块版本的情况下安装最新版(非预发行版)模块。 但是,仅当以前的版本是使用 Install-Module 安装的,此 cmdlet 才有效。
若要更新预安装的模块,必须使用 Install-Module。 从 PowerShell 库安装新版本后,可使用 Update-Module 安装较新版本。
# 测试是否存在
Get-Module -ListAvailable PackageManagement,PowerShellGet

# 安装
Install-Module PowerShellGet -Force

# 升级
Update-Module -Name PowerShellGet -Force
安装模块
# 安装 PSReadLine,posh-git,PSFzf,Terminal-Icons,z
Install-Module -Name PSReadLine,posh-git,PSFzf,Terminal-Icons,z -Scope CurrentUser -Force
Proxy
如果下载实在恼火,可以使用 -Verbose 参数来显示详细的下载信息,同时你也可以使用Proxy来加速你的下载。
$PSDefaultParameterValues 首选项变量使你能够为任何 cmdlet 或高级函数指定自定义默认值。
# 搜索支持代理的cmdlet
Get-Command -ParameterName Proxy

# 设置代理
$Proxy = 'http://10.0.0.200:7890'
$PSDefaultParameterValues = @{
     'Install-Module:Proxy' = $Proxy
     'Update-Module:Proxy' = $Proxy
}

# 如果您已经在使用,$PSDefaultParameterValues请将新条目添加到哈希中
$Proxy = 'http://localhost:7890'
$PSDefaultParameterValues.Add('Invoke-WebRequest:Proxy', $Proxy)
$PSDefaultParameterValues.Add('Invoke-RestMethod:Proxy', $Proxy)

# 全部设置为代理
$PSDefaultParameterValues = @{ "*:Proxy"="http://10.0.0.200:7890" }你可以在 https://www.powershellgallery.com 查找、安装、更新模块、DSC 资源、角色功能和脚本等项目的 PowerShell 包的 cmdlet。
安装 Oh My Posh
Oh My Posh支持多种安装方式,更多的安装方式可以参考官方安装方式
# 使用管理员开启winget代理选项
winget settings --enable ProxyCommandLineOptions

# 安装 Oh My Posh
winget install JanDeDobbeleer.OhMyPosh -s winget --proxy http://10.0.0.200:7890
安装字体
默认的字体会引起部分字体不支持的情况,建议使用 NerdFonts 字体。它可以在 Latest Release (github.com) 进行下载。
当然也可以使用scoop来进行管理
# 添加 nerd-fonts Bucket
scoop bucket add nerd-fonts

# 安装字体
scoop install Meslo-NF Hack-NF-Mono
外观设置
Windows Terminal 的配色方案可以在 Windows Terminal Themes 选择。
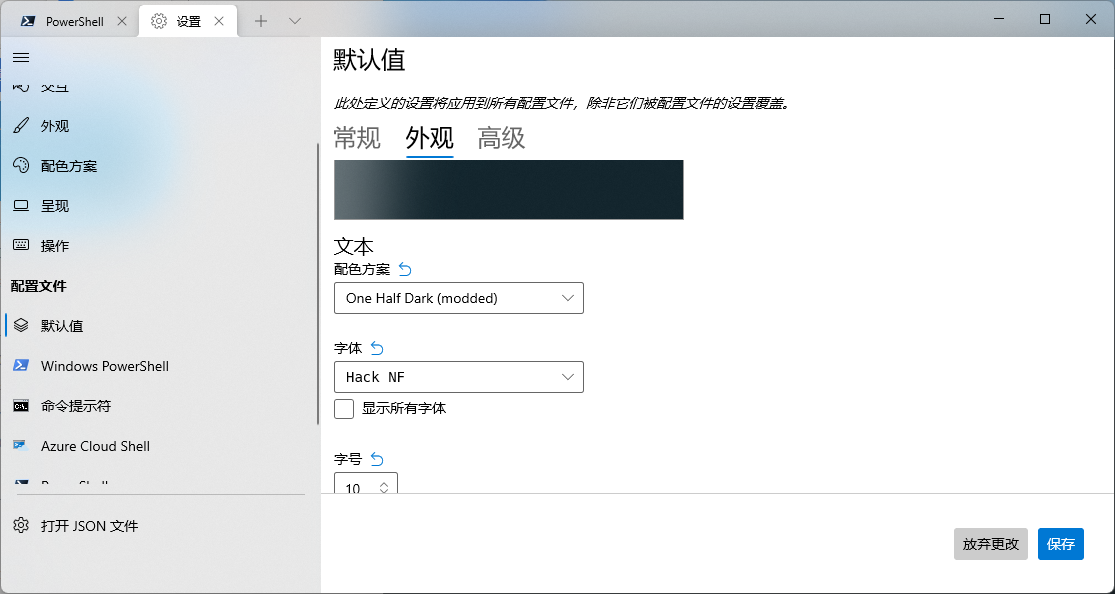
配置文件
使用 code $profile 打开配置文件将如下配置粘贴即可。
# set PowerShell to UTF-8
[console]::InputEncoding = [console]::OutputEncoding = New-Object System.Text.UTF8Encoding

#Import-Module oh-my-posh
oh-my-posh init pwsh --config "$env:POSH_THEMES_PATH\agnoster.omp.json" | Invoke-Expression

Import-Module -Name Terminal-Icons
Import-Module posh-git

# PSReadLine
# Set-PSReadLineOption -EditMode Emacs
# Set-PSReadLineOption -BellStyle None
Set-PSReadLineKeyHandler -Chord 'Ctrl+d' -Function DeleteChar
# Set-PSReadLineOption -PredictionSource History

#设置预测文本来源为历史记录
$PSReadLineOptions = @{
  EditMode = "Emacs"
  BellStyle = "None"
  PredictionSource  = "History"
  HistoryNoDuplicates = $true
  HistorySearchCursorMovesToEnd = $true
  Colors = @{
      Command             = [ConsoleColor]::Gray
      Number              = [ConsoleColor]::DarkGreen
      Member              = [ConsoleColor]::DarkMagenta
      Operator            = [ConsoleColor]::DarkBlue
      Type                = [ConsoleColor]::DarkRed
      Variable            = [ConsoleColor]::DarkYellow
      Parameter           = [ConsoleColor]::DarkGreen
      ContinuationPrompt  = [ConsoleColor]::Gray
      Default             = [ConsoleColor]::White
      Emphasis            = [ConsoleColor]::Gray
      Error               = [ConsoleColor]::DarkRed
      Selection           = [ConsoleColor]::Gray
      Comment             = [ConsoleColor]::DarkCyan
      Keyword             = [ConsoleColor]::DarkRed
      String              = [ConsoleColor]::Gray
      InlinePrediction    = [ConsoleColor]::DarkRed
  }
}
Set-PSReadLineOption @PSReadLineOptions

# Fzf
Import-Module PSFzf
Set-PsFzfOption -PSReadlineChordProvider 'Ctrl+f' -PSReadlineChordReverseHistory 'Ctrl+r'

# Env
$env:GIT_SSH = "C:\Windows\system32\OpenSSH\ssh.exe"

# Alias
Set-Alias ll ls
Set-Alias g git
Set-Alias grep findstr
Set-Alias tig 'C:\Program Files\Git\usr\bin\tig.exe'
Set-Alias less 'C:\Program Files\Git\usr\bin\less.exe'

# Utilities
function which ($command) {
  Get-Command -Name $command -ErrorAction SilentlyContinue |
    Select-Object -ExpandProperty Path -ErrorAction SilentlyContinue
}
定义自定义的命令函数
function set_proxy {
  $PROXY_HTTP = "http://192.168.5.201:7890"
  $PROXY_SOCKS5 = "socks5://192.168.5.201:7891"

  Set-Item -Path Env:HTTP_PROXY -Value $PROXY_HTTP
  Set-Item -Path Env:HTTPS_PROXY -Value $PROXY_HTTP

  # forever
  # [Environment]::SetEnvironmentVariable("http_proxy", $PROXY_HTTP, [EnvironmentVariableTarget]::Process)
  # [Environment]::SetEnvironmentVariable("https_proxy", $PROXY_HTTP, [EnvironmentVariableTarget]::Process)

  ls env:*PROXY

  Write-Host "`n代理设置成功!" -Foreground "Green"
}

function unset_proxy {

  Remove-Item Env:HTTP_PROXY
  Remove-Item Env:HTTPS_PROXY

  Write-Host "代理设置已清除...." -Foreground "Red"

}

Set-Alias proxy set_proxy
Set-Alias unproxy unset_proxy

function Invoke-FileHashMD5 {
    param( $File )
    certutil -hashfile $File MD5
}

function Invoke-FileHashSHA1 {
    param( $File )
    certutil -hashfile $File SHA1
}

Set-Alias -Name md5 -Value "Invoke-FileHashMD5"
Set-Alias -Name sha1 -Value "Invoke-FileHashSHA1"
设置 Oh My Posh 主题样式
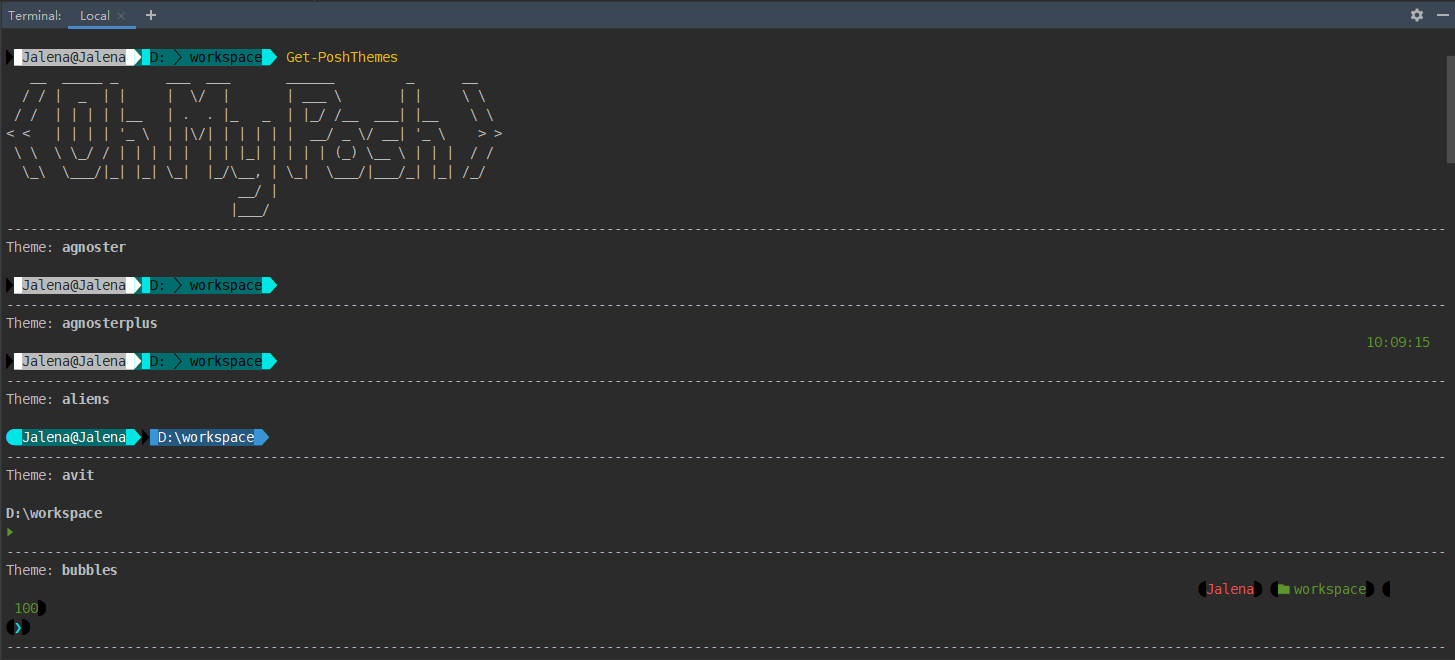
使用 Get-PoshThemes 命令可以打印所有支持的主题样式。
修改输出颜色
若需要自定义PSReadLineOption的Color,可以使用[Enum]::GetValues([System.ConsoleColor])|ForEach-Object {Write-Host $_ -ForegroundColor $_}来获取系统已有的颜色变量。同时也可以使用[ConsoleColor]::加Tab来获取支持的枚举值。
# 查看当前颜色设置
Get-PSReadLineOption | findstr 'Color'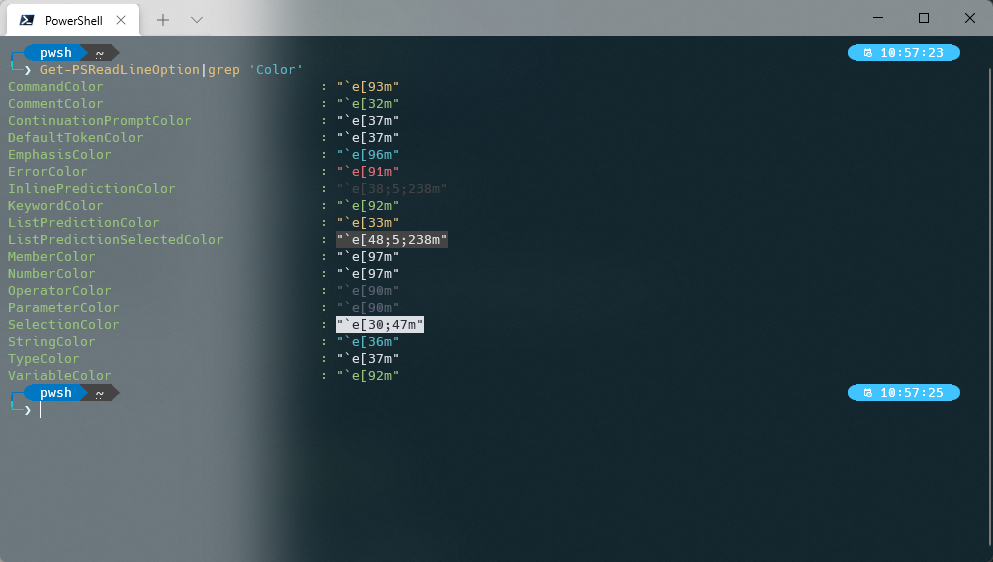
# Set Colors
Set-PSReadLineOption -Colors @{
    "Parameter"=[ConsoleColor]::DarkGreen
    "Operator"=[ConsoleColor]::DarkYellow
}
效果图

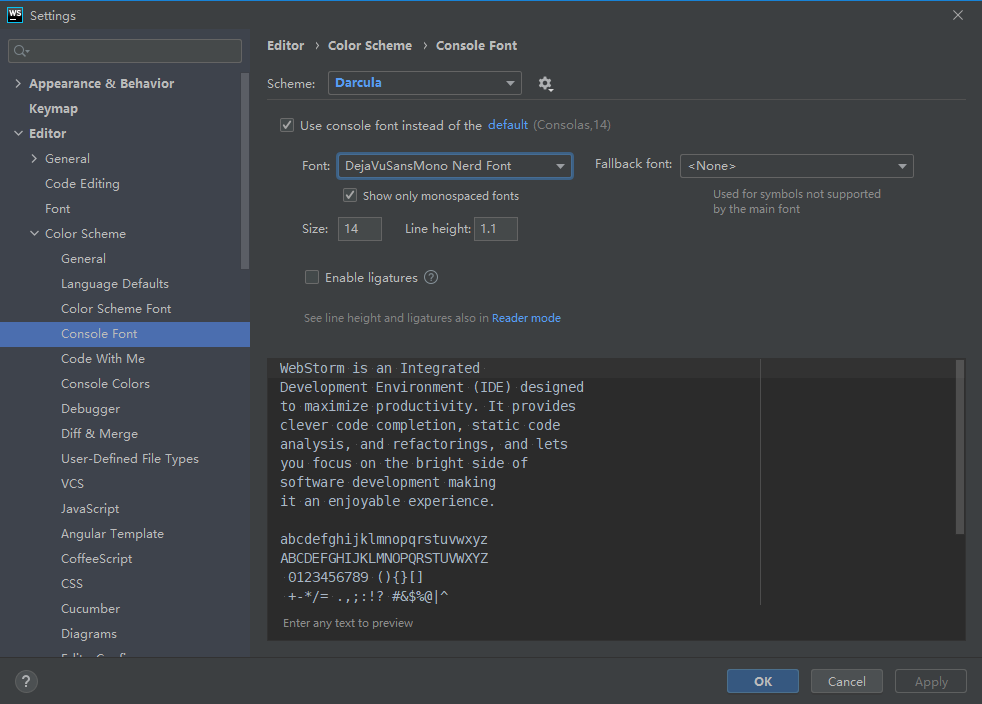
IDEA 等设置
在实际使用中,发现IDEA下显示错乱,这是由于IDEA中默认的Terminal字体用的是Consolas,这个字体不是完全支持PSReadLine,这时只需要在Setting -> Editor -> Color Scheme -> Console Font中将其指定为我们自己的字体即可。


文章评论